Crop Out: Exploring Into Digital Image Processing
Once when I was writing a technical tutorial, I noticed that some images needed to be manipulated for better display. One example can be high-resolution screenshots.

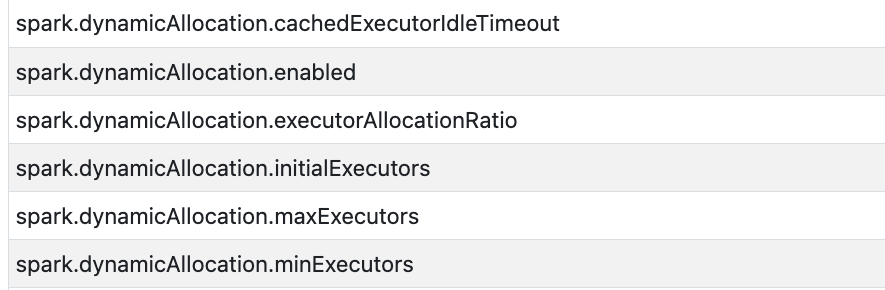
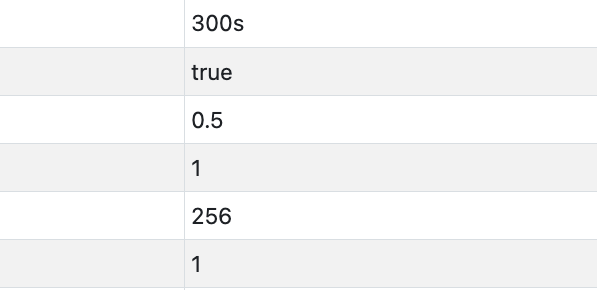
The above screenshot taken from the environment tab of Spark Web UI on a 4K UHD monitor was supposed to show some configuration information. However, it’s almost impossible to read the text content in the image especially when the image is scaled down and embedded in other text, as senseless padding takes up the majority of the space.
The first and most natural thought is to crop out the padding part on the right side of the image, which could be easily implemented merely with the image processing tool that comes with the operation system, such as macOS Preview.

The cropped image looks better than the original, but it’s not enough. The tricky part comes in cropping out the padding in the middle of the two columns of text in the image, and then stitch the left and right parts together. Undoubtedly, this task can be accomplished with some powerful raster graphics editors like Adobe Photoshop. But if one is looking for the lightweight solution, that’s where the imaging libraries like Pillow and OpenCV kick in.
The solution can be refined into several sub-tasks. Although a general solution is preferable, for illustration purposes, this article will focus on the specific problem that mentioned above, i.e., how to crop out the middle part of an image and then stitch the remaining left and right parts together?
Loading Original Image
A handy tool to implement the solution is Pillow, the open-source, cross-platform library for image processing in Python. After installation, we shall start by loading the image and obtaining its dimensions.
from PIL import Image

# load an image from a file
# an Image object will be returned if successful
img = PIL.Image.open("/data/cropped_screenshot.png")

print(img.size)

# output
"""
(2957, 290)
"""
We can use Image.show method to display the image. On macOS, the image will be opened with the Preview application. Since we haven’t made any modifications to it yet, the picture shown should look exactly like the cropped screenshot above.
Defining Bounding Boxes
The next step is to define the bounding boxes for the left and right portions that we would like to keep, and then crop the image using these bounding boxes.
To crop the input image, we need to provide the left, upper, right, and lower pixel coordinate of a rectangular region that would be extracted from the image. According to the coordinate system, the coordinates of the upper left corner are (0, 0) and a rectangle can be represented as (x1, y1, x2, y2). Getting back to the original scenario, we can obtain the partial coordinates of the left part cropped image, i.e., (0, 0, x2, height), as well as the partial coordinates of the right part cropped image, i.e., (x1, 0, width, height).
Since we already know the size of the image, we can estimate the exact values of x1 and x2 by visual inspection. Alternatively, or maybe more preferably, we can insert a number of, such as ten, vertical red lines evenly in the image as an auxiliary.
from PIL import ImageDraw

# make a copy of the image
img_copy = img.copy()

# create an ImageDraw object for the copy
draw = ImageDraw.Draw(img_copy)
# number of lines to draw
num_lines = 10

# calculate the distance between each line
width, height = img_copy.size
dist = width // num_lines

# draw the vertical lines
for i in range(num_lines):
    line_start = i * dist
    draw.line((line_start, 0, line_start, height), fill='red', width=6)

# display the modified copy
img_copy.show()

The entire image is divided into ten parts by the red line. Do note that the first red line is on the far left of the image and its abscissa is 0. Then, we should be able to decide the component of left image and right image. For aesthetic reasons, we choose the first three parts to form the left image, and the ninth and tenth parts to form the right image. In other words, the middle five parts are cropped out. At this point, we have determined the values of all the coordinate variables.
# calculate x1 and x2 that mentioned above
x2 = (2 + 1) * dist
x1 = (9 - 1) * dist

# cut out the left and right parts from the original image
left_img = img.crop((0, 0, x2, height))
right_img = img.crop((x1, 0, width, height))

# display to ensure images are appropriate
left_img.show()
right_img.show()
Pasting Cropped Images
So far it’s all going smoothly. The final step is to create a new image that has the combined width of the left image and right image and the same height as the original image. Subsequently, we only need to paste the left and right images onto the new image.
# obtain the width of the left image and right image
left_img_width = left_img.size[0] # equals to x2
right_img_width = right_img.size[0] # equals to width - x1

# create the new image with the given mode and size
new_img = Image.new('RGB', (left_img_width + right_img_width, height))

# paste the left and right images onto the new image
new_img.paste(left_img, (0, 0))
new_img.paste(right_img, (left_img_width, 0))

# display and review
new_img.show()

# save the processed image
new_img.save('final_image.png')

Obviously, the display of the image has been significantly improved compared to the original one.
This article is based on Python 3.10.10 and Pillow 9.4.0.